

We have a fairly complicated setup of equipment in our home for playing DVDs. For best playback, three devices are involved:
Because our television has always had mediocre audio performance, we play the audio of it and our other devices through our stereo receiver. Movie scores are richer and fuller, and dialog is noticeably more understandable when played through the stereo rather than the television.
Using devices from three different manufacturers means having multiple remotes. We habitually use "universal" remotes with multiple modes (TV, DVD, stereo). However, it is inconvenient to use remotes with multiple modes, and it is remarkably easy to get the whole system in a state where audio playback stops working. This is very common when you forget you have left your remote in "stereo mode" and then press a DVD function.
For good DVD or Blu-ray playback, we use this configuration:
While we have become accustomed to the complexity of our system, it is especially perplexing to house guests. I resolved to create some kind of "entertainment system control" that would be easy for a guest and that would prevent them from making most kinds of errors.
We use various smart lights, switches, and motion detectors around our home, standardized around the Tasmota open source firmware for ESP devices.
Also as part of our system, we have a Raspberry Pi running a Mosquitto MQTT broker for passing messages between smart devices.
Our Raspberry Pi also runs a web server and a websocket service that make it easy to publish messages to smart devices from a web browser (including the browser on a smart phone).
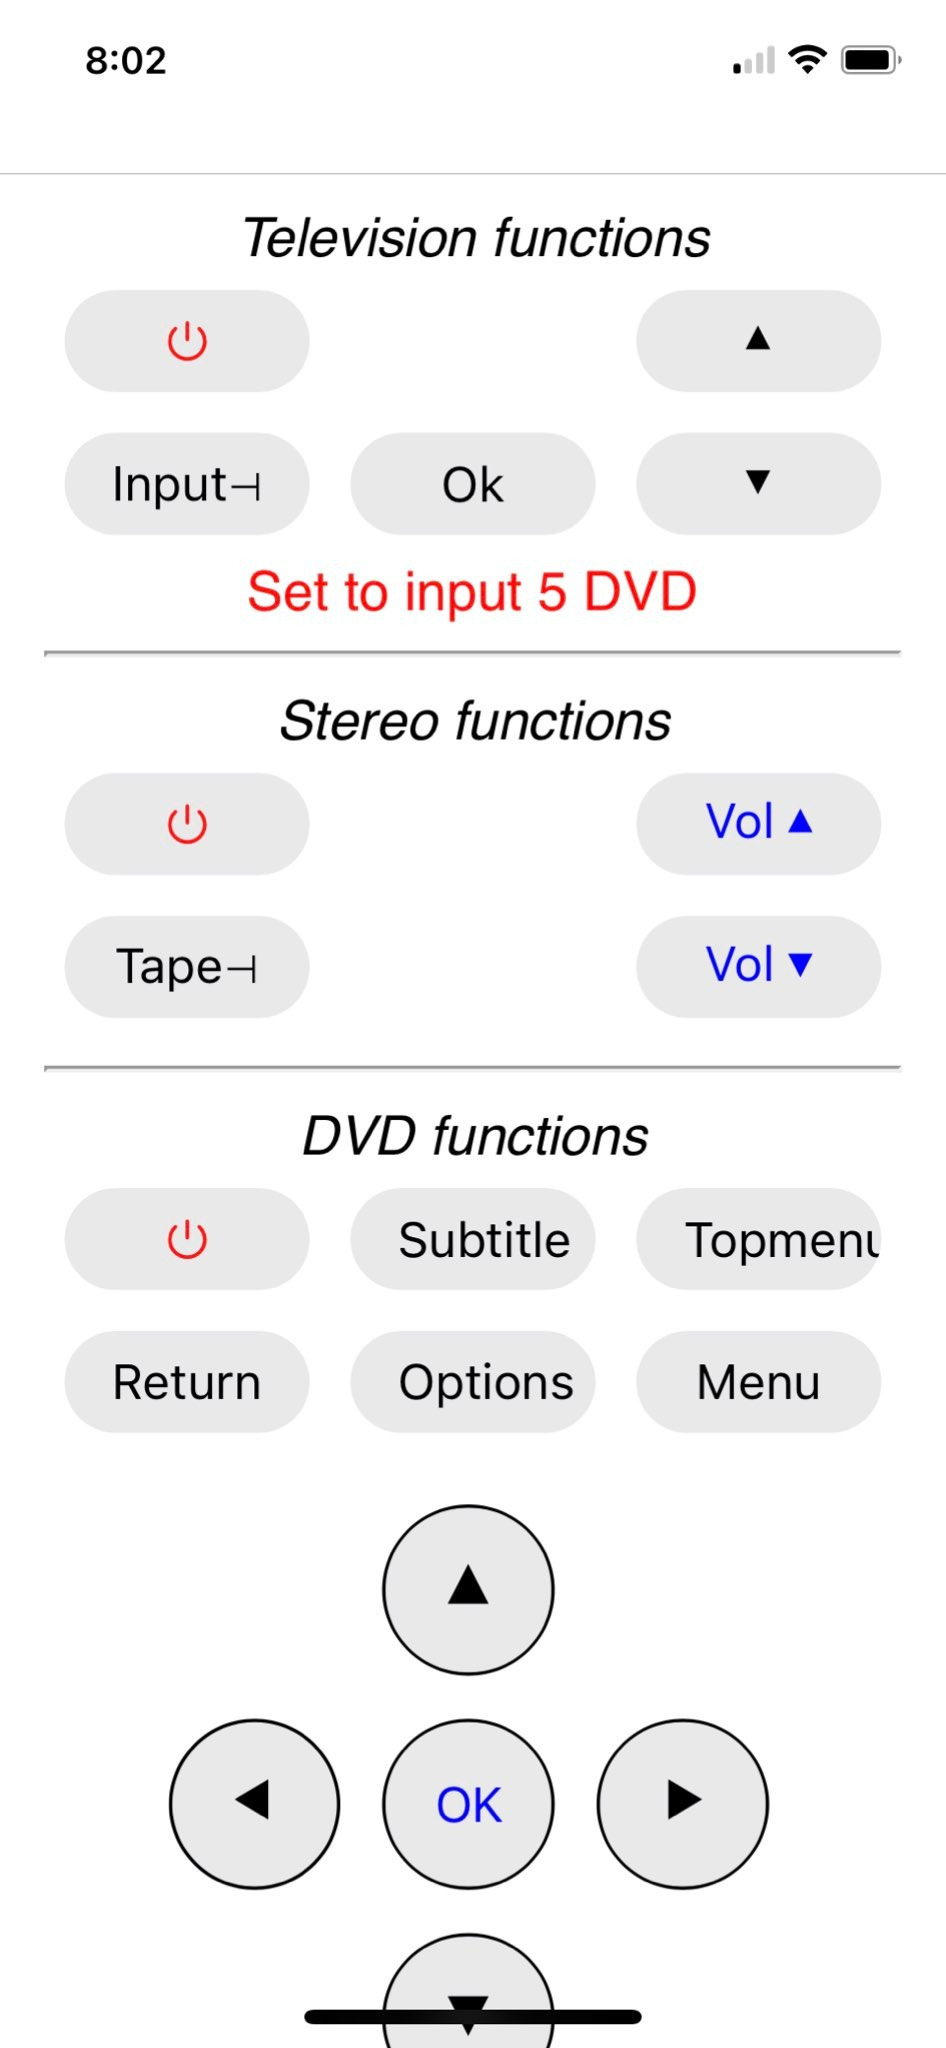
Our goal is to create a web page leveraging the existing system to control the television, receiver, and DVD player. It should include every function/button you would want for watching a movie but none of the functions that can lead to problems.
To control our devices, we needed something that can transmit infrared signals the way a television remote does. There are many suppliers of infrared receiver/transmitter boards that are compatible with Tasmota. I bought this one: https://www.aliexpress.us/item/3256804299753326.html.
To prepare this IR board to control my equipment, I downloaded the tasmota-ir.bin firmware from the Tasmota release page. Flashing requires a 5V power supply for the board, and a 3.3V TTL serial interface adapter for the programming connection (because the IO pins on the ESP8266 are only 3.3V tolerant). Connections are:
As a Linux user, I've had the most consistent luck flashing Tasmota devices with this tool: https://github.com/igrr/esptool-ck. I used the following command line.
$ esptool -cp /dev/ttyUSB0 -cb 115200 -bm dout -cf tasmota-ir.bin -v
Once the firmware has been successfully flashed, the jumper between GND and IO0 can be removed. It will boot Tasmota when 5V power is supplied. I used a spare USB power adapter that I had on hand, and I have permanently mounted this transmitter in view of my media center.
Once our IR board is flashed with the Tasmota firmware, we need to configure it for our wireless network and MQTT broker. We also need to set it to use the correct IO pins on its microcontroller for receiving and sending IR signals:
{"NAME":"IR bridge","GPIO":[1,1,1,1,1056,1,1,1,1,1,1088,1,1,1],"FLAG":0,"BASE":18}
GroupTopic2 remoteWith this configured, the device will respond to messages sent to the "cmnd/remote/IRsend" topic.
To make our interface work, we need to know the codes of all the remote controls we intend to duplicate. Fortunately, we can use the IR receiver on our board to save the codes from our existing remote controls. To do this, open the Console from the main menu, and point a remote at the black IR receiver on the board. Press one of the keys on the remote. You may see several messages on the console when you do this, but you are looking for a message that looks something like this:
tele/tasmota_82EAFB/RESULT = {"IrReceived":{"Protocol":"RC6","Bits":36,"Data":"0xC8011920C","DataLSB":"0x3001884930","Repeat":0}}
(This particular command is for my television's remote Power button.)
Create a list of each of the codes you may wish to use. Here is my personal list of functions and codes: remote-commands.txt
The Console can also be used to send IR codes, and we can use that to test that our saved codes actually work. Point the IR emitter (the clear LED on the board) at your television or other device and give an IRsend command to the console:
IRsend {"Protocol":"RC6","Bits":36,"Data":"0xC8011920C","DataLSB":"0x3001884930","Repeat":0}
When we have verified that the IR board can control our devices, we are ready to mount it permanently and move on to creating a pleasing user interface.
Our final user interface (below) is written in HTML, CSS, and JavaScript. To make it easier for our JavaScript code to send MQTT commands, I made a very simple websocket server that injects messages into our MQTT broker. It listens for websocket connections with a payload containing a 'topic' name and a 'message' value. It then connects to our MQTT server and passes the topic and message on without modification.
#!/usr/bin/python3

# A websockets interface to our mqtt server.  Relay
# messages received on the websocket and publish them
# to mqtt.

# This websockets server is started by systemd at boot time.

import asyncio
import websockets
import json
import asyncio_mqtt

async def wsserver( websocket, path ):
    try:
        wsdata = await websocket.recv()
        data = json.loads( wsdata )

	# modify the next line for the address of your mqtt host
        async with asyncio_mqtt.Client( "192.168.x.xxx" ) as mqtt:
            await mqtt.publish( data['topic'], data['message'] )
    except:
        pass

async def main():
    async with websockets.serve(wsserver, '0.0.0.0', 8765):
        await asyncio.Future() # run forever

if __name__ == "__main__":
    asyncio.run(main())
We finally have all the parts in place to create a user interface. Our IR board is flashed with firmware, it has its IO pins configured, and is connected to our MQTT broker. When physically mounted in view of our devices, transmitted codes work just like any other remote. To finish things off, we create a styled web page that sends the codes we saved earlier.
Example code:
You'll note that the actual code is very straightforward. Each button on the web page has an onclick handler that publishes one infrared remote code (to our websocket relay which then injects it into our MQTT broker).
And a screen shot from Safari on an iPhone.
Return to: [Don Bindner]